Saturday, December 7, 2019

[PythonOOPTutorial] 03 Python Access Modifiers

This is the third article of the Python OOP Tutorials.
If you are new to Python, this is how to install Python on your computer.

Basically access modifiers are some sort of keywords used to control or limit the accessibility of attributes, methods, functions, classes, etc... Simply access modifiers define the scope of the components. When it comes to Python there are no specific keywords to define access modifiers; but the number of underscore parameters handles that.

In Python there are 3 access modifier levels.
  • public (no underscore parameters as prefix)
  • private (two underscore parameters as prefix)
  • protected (one underscore parameter as prefix)
Lets learn about those using Python attributes.


Public access modifier:

When an attribute is public, that can be accessed from each and every class. Simply it is visible for all the classes.
There are no underscore parameters as attribute name prefixes.


Private access modifier:

When an attribute is private, that can only be accessed within the same class. When we try to access a private attribute from outside the class it will throw an AttributeError error.
To make an attribute private, we use two underscore parameters as an attribute name prefix.
Since private attributes are not accessible from outside the class, we can write a public method inside the same class to access the private variable.


Protected access modifier:

When an attribute is protected, that can be accessed from the same class or from a sub-class of that class. When we try to access a protected attribute from outside the class which is also not a sub-class it will throw an AttributeError error.
To make an attribute protected, we use one underscore parameter as an attribute name prefix.
From this example you can also understand how to create a sub-class using a super-class. Here class Dog is created by extending the class Animal.


So now you are aware of how to handle access modifier of the Python.
Lets discuss about OOP with Python from the next article.


Cheers...!!

Sunday, November 24, 2019

[PythonOOPTutorial] 02 Python Classes, Attributes, Methods and Functions

This is the second article of the Python OOP Tutorials.
If you are new to Python, this is how to install Python on your computer.

In this tutorials we assume you have some basic experience in programming.


CLASSES

Below is how to define a class in Python.

Here "Animal" is the class name. Currently we do not have any attributes or methods in it. So we write "pass" inside it. You can find more about Python empty classes from here. At the end we have created an object using out empty class.
We use the keyword "class" before the class name and ":" symbol after the class name based on Python standards.

You can find more about Python naming conventions from here.


ATTRIBUTES

Classes can contain different attributes which describe the class.
In Python we do not need to define the type of the attribute; it is not mandatory.

Below is how to define attributes and assign values for attributes in Python.

To comment a line you can use "#" symbol in the beginning of the line

When it comes to attributes, there are two types of attributes.
  • Class Attributes - Value common for all the instances of the class
  • Instance Attributes - Values changes based on the instance
If you need more details about Class attributes and Instance attributes please refer this.


METHODS

Classes may contain different methods which serves an specific task.
Below is how to define methods in Python.
Here method name is "sound". We use keyword "def" before method name and ":" symbol after the method name. As the default input parameter we have to pass the object which invokes the method as an input parameter "(self)".

Python has methods and functions. We have to keep that in mind carefully. You can find out more about those differences on methods and functions from here.

When it comes to Python methods;
  1. Method is always associated to an object.
  2. The object which invokes the method, will be passes as a parameter to the method.
  3. Returning data from a method is optional.
There are two types of methods in Python.
  • Instance Methods
  • Static Methods
If you need more details about Instance methods and Static methods, please refer this.


FUNCTIONS

Functions are almost like Methods, but those are not associated with objects. You can define a function in the same way as a method. Functions do not need default input parameters; input parameters are optional for functions.

Here we have a function called printCountry which has an input parameter which is optional. Additionally we have assign that input parameter a value. It will be used when we call the function without passing a parameter.

First we call our function with the argument "India". So it will assign India to the input parameter and print Country name is India.
At third function call we do not pass any argument to the function. So it will assign Sri Lanka to the input parameter and print Country name is Sri Lanka


Those are the fundamentals of Python required for OOP (Object Oriented Programming).
Lets discuss about OOP with Python from the next article.


Cheers...!!


More about Class attributes and Instance attributes..

For example consider we have a class called Animal and it has a Class attribute called numberOfLegs.
So when we assign a value for a class attribute it is same across all its instances.


To change the value we have to access it with the class reference; not with the object reference. If we try to change the value of the class variable using object reference, it will create a Instance attribute with the same name.
Here initially there are no instance attributes called numberOfLegs. So animal1 and animal2 objects will display the value as 4. 

Then we change the value of numberOfLegs for animal1 object. So what will happen is instance attribute will be created for animal1 object and its value will be 3.

When we ask for the value of any attribute; system will check whether there is any instance attribute with the same name; if a matching instance attribute found, system will return that value.
If there is no matching instance attribute found, then system will check for class attributes.

At animal1 object, system will find the instance attribute and return its value 3.
At animal2 object, system will cannot find a instance attribute and then checks for a class attribute. Then system find the class attribute and return its value 4.


More about Instance methods and Static methods..

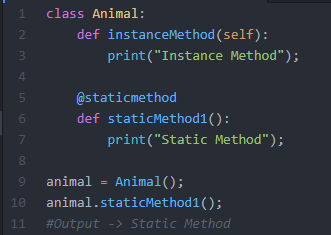
Usually we write methods inside classes where at least one input parameter is required are called Instance methods. Static methods are bit different from instance methods.
On static methods we do not need the default self parameter. To make a static method we have to use the @staticmethod annotation before the method definition. So that will make a static method.
We can call static methods by the class reference too.

Ex: here we have called the static method by creating an object reference. 
animal = Animal();
animal.staticMethod1();

Other than that, we can directly call the static method using the class reference too.
Animal.staticMethod1();
This will also provide the same output.

Saturday, November 23, 2019

[PythonOOPTutorial] 01 How to Setup Python

This is the first article of the Python OOP Tutorials.

First you can check whether you have already installed python on your computer by executing following command.

"python --version"


If python version is displayed, then it says you have already installed Python on your computer. Otherwise you can follow below steps to install python on your computer.

You can download Python setup from Python.org. From there it is always better to download the latest version.


If you want to download a previous version you can choose those from the "Downloads" section. (Python downloads page)

There are different download types and you can select what is most suitable based on your operating system and requirement. What I prefer is exe version.

Then run the downloaded exe file. Do not forget to check the "Add to path" checkbox. Otherwise you will have to add Python for the PATH manually. 

After successful installation you can run the previous command again and check for the current Python version check by the command "python --version". It should work now.To make sure Python is working fine, you can download below file and run it.Sample file: https://drive.google.com/open?id=1vHIAmN7cpfqjJNESmY-23ABSE9rm5THZ- Open command prompt.
- Navigate to the file saved location.
- Run "py TestPython.py"
Then you will get output like below.
Now Python is working fine in your computer. Lets continue the learning process.
Cheers...!!


Wednesday, August 7, 2019

Canary Tokens (Traps) – Expose Information Leaks

Canary Tokens are traps to identify information leaks. Using canary tokens you can identify who has accessed your secret files (timestamp, geographical location, etc...)

You can generate canary tokens in different formats. To generate canary token you can visit below websites.


>> Lets start with the first website. 

  • First you have to select the token type from the drop-down. For our easiness select "MS Word" option.
  • your email address (when file is accessed, notification will be sent to this email address)
  • some text to identify the token

Then download the generated canary token. When you open the file, you will get an email notification as below (you can edit the content of the downloaded MS Word file as you wish. You can include some false information and an attractive file name such as "my_passwords". So hackers will surely open that file and you will get their information)


When you open the email alert you will see some details of the file access.


By clicking on the "Manage this Canarytoken" you can manage the future email notifications for this canary token.
By clicking on the "More info on this token" you can see details access information.


>> If you visit the second website first you have to enter two fields.

  • your email address (when file is accessed, notification will be sent to this email address)
  • some text to identify the token

After clicking on "Generate Token" button you will see what are the available options to generate canary tokens. Below are some of the token types available.

  • Web bugs
  • DNS Tokens
  • SMTP Token
  • Remote Image
  • QR Code
  • SQL Server Alert on SELECT, UPDATE, INSERT, DELETE
  • MS Word
  • Acrobat Reader PDF
  • SVN Token
  • Signed EXE / DLL
  • SecretKeeper Token
  • Windows Directory Browsing

For this example you can select "MS Word" and download the canary token file. When you open the file, you will get an email notification as below (you can edit the content of the downloaded MS Word file as you wish. You can include some false information and an attractive file name such as "my_passwords". So hackers will surely open that file and you will get their information)


When you open the email alert you will see all details of the file access.


When you visit the provided url at the bottom of the email, you will be able to see the file access history too.

Using MS Word files is just a one way to use canary tokens. There are lots of options available and you can use those wisely.


Cheers...!!

Thursday, September 6, 2018

AWS SQS Standard Queue vs FIFO Queue

When it comes to cloud computing, AWS plays a major role as a IaaS (Infrastructure as a Service), PaaS (Platform as a Service) and SaaS (Software as a Service). Amazon Web Service (AWS) is a well known public cloud service provider. You can find out more about AWS from https://aws.amazon.com/

Simple Queue Service is one of the most useful service which is provided by AWS. If you are using AWS then no need to waste your time on implementing queues. AWS has done that part for you. You just have to use it. You can find more details from https://aws.amazon.com/sqs/

AWS SQS provides two types of queues.
  • Standard Queue
  • FIFO Queue (First In First Out queue)

Comparison of Standard and FIFO queue types are as below.

Standard Queue FIFO Queue
Available on all AWS regions Available in the US West (Oregon), US East (Ohio), US East (N. Virginia), and EU (Ireland) regions
Unlimited Throughput Support up to 3,000 messages per second
Message delivered at least once, but occasionally more than one Delivered once
Not execute in order they sent First in first out
Good for high throughput scenarios Recommended when order of the event is important


Hope this will help you too.


Cheers...!!

Wednesday, August 16, 2017

Solve unrelated svn blames while building projects with maven

Previously I have used Subversion as the version control system. Then moved the projects to Git. Converted all the Jenkins build jobs accordingly. But while building some sonar jobs got below error.

[ERROR] Failed to execute goal org.codehaus.mojo:sonar-maven-plugin:2.6:sonar (default-cli) on project YourTestProject: The svn blame command [svn blame --xml --non-interactive -x -w --username ******** --password ******** src/your/test/project/code/path/Main.java] failed: svn: 'src/your/test/project/code/path/' is not a working copy -> [Help 1]

Since we are using Git and so no need of any svn blames. Using below parameters disabled svn activities.

-Dsonar.scm.disabled=True

Hope this will help you too.


Cheers...!!

Saturday, June 11, 2016

Solve Jenkins Maven jobs build fail due to OutOfMemoryError

There are two major OutOfMemoryError types.

  1. java.lang.OutOfMemoryError: Heap space
  2. java.lang.OutOfMemoryError: PermGen space
You can easily solve this by adding/changing Jenkins environment variables.
Go to
Manage Jenkins >> Configure System >> 
In the Global Properties section check the Environment Variables check box.

Then add parameters as below
Name: MAVEN_OPTS
Value: -Xmx1024m -XX:MaxPermSize=1024m

Setting Xmx will solve your Heap Space issue and setting XX:MaxPermSize will solve your PermGen Space issues.


Cheers...!!