Tuesday, December 10, 2019

[PythonOOPTutorial] 04 Object Oriented Programming Using Python

This is the forth article of the Python OOP Tutorials.
If you are new to Python, this is how to install Python on your computer.

When it comes to Object Oriented Programming, it has four main concepts:
  • Abstraction
  • Encapsulation
  • Inheritance
  • Polymorphism
Lets discuss those one by one.


ABSTRACTION:


Abstraction is simply hiding the real complexity of the code from the user. It hides internal implementation of the code from user; only required parts will be exposed.

For ex:

Without having any idea how engine works or ignition works, a driver can start a car. He do not need to know how battery is supplying power, how engine works, how fuel is pumping, etc... Same thing is applied here.


Above is a simple example for abstraction. If we go into more details most suitable example for abstraction can be explained using Abstract classes. You can learn more about Abstract classes from here.

For Ex:

Consider we have an abstract class Vehicle and extended class Car. In vehicle we write an abstract which is common to all the vehicles - "start" method. So we can implement that method in extended class as we want.


ENCAPSULATION:


Main idea of encapsulation is wrapping the attributes. We can use this to restrict unintentional data modifications.

For Ex:

Consider there is a Student class and a private attribute called age. So age should be always a positive value. So we can implement that as follows using object oriented programming concepts.
Here when user enters 16 as age, system allows that to be saved because 16 is a valid age. But when user enters -3 as age, system do not allows that to be saved because -3 is not a valid age; so age will remain as 16. After that when user enter 21 as age, system allows that to be saved because 21 is a valid age. So like that we can do so many things using OOP concept encapsulation.


INHERITANCE:


Inheritance is process of deriving parent class (super class) attributes and methods to its child classes (sub classes). In real life examples, we will have our parents' qualities, behaviours and features; those are inherited from parent to child. Same thing happens in Python too. When we extend a class (child class) from another existing class (parent class).

Please note private attributes and members are not inherited to child classes; because they are private. Only public and protected attributes and methods are inherited to child classes. If you want more information about Python access modifiers please refer this.

When it comes to Python Inheritance, there are two major levels:
  • Single inheritance
  • Multiple inheritance

Single Inheritance:

Basic way to define Car class is like below.
class Car:
But when we want Car class to extend Vehicle, we have to change it like below.
class Car(Vehicle):

Here Vehicle is the parent class which has two public and protected attributes. Car class is extending Vehicle class. So as I mentioned in the screenshot, vehicle attributes are accessible even from car class objects. That is because Car class is extending Vehicle class. Same thing goes with methods too.

Multiple Inheritance:

What we have discussed above is Single inheritance (those child classes inherit only one parent class). So Multiple inheritance means there can be child classes which are extended by multiple parent classes. 

A child may inherit skills from both his mother and father.
Above example describes how basic multiple inheritance will work using attributes. Here "canCook" attribute is inherited from Mother class and "canSwim" attribute is inherited from Father class.
Same applies to the methods too.

Then let us consider if both classes have the same attributes how Python is working.
Here system prints "Baby can dance". When there is a conflict among attributes or methods while multiple inheritance, system will act according to the first parent class. At this case it it Mother class.
class Baby (Mother, Father)
If we change the order of inheritance like class Baby (Father, Mother) system will not print "Baby can dance".


In addition to those there is a concept called "Multi-level Inheritance".

For Ex:

Consider below HondaCivic class; it is inherited from Car class; it is inherited from Vehicle class. This is called Multi-level inheritance and the last class at the hierarchy can access all super class attributes and methods.


POLYMORPHISM:


Polymorphism is simply having multiple formats. When it comes to Object Oriented Programming polymorphism, it has two sub concepts;
  • Overriding
  • Overloading

Overriding:


Overriding is directly related to inheritance; user can override something which is defined in super class (parent class).
Here Vehicle class has a start method. When we create a Vehicle object and call start method it will print "Vehicle starting..!!". 
Then we create a Car object and call the start method; but Car class do not have a start method. One important thing, Car class extends Vehicle class. So it can access its parent class methods. So Car object start method will also print "Vehicle starting..!!".
This is called Inheritance.

Here Car class also has a start method. When we call start method of  Car object, system will print "Car starting..!!". This is called Overriding. Here Vehicle object start method is overridden by Car object start method.


Overloading:

In normal OOP concepts Overloading means changing the input parameters without changing the method name. In Python in a single class we cannot have two methods with the same name. So for overloading we use a different technique.
Here at the Calculator class we have a method called "getSum". We can call that method with two parameters and with three parameters. When we call it with two parameters third parameter "c" will be initialized as zero (as we defined). This is called an "Optional Parameter" in Python. So nothing will happen to the summation flow. If we pass three parameters to the method, then it will return the sum of three parameters.
Like that if we want to take the multiplication value we have to initialize value of "c" to one (c=1) to get the correct answer. So always you have to initialize the optional values carefully. Otherwise you will not get the expected outcome.


So these are the basic Object Oriented Programming concepts using Python. Hope this is useful for you.


Cheers...!!

Saturday, December 7, 2019

[PythonOOPTutorial] 03 Python Access Modifiers

This is the third article of the Python OOP Tutorials.
If you are new to Python, this is how to install Python on your computer.

Basically access modifiers are some sort of keywords used to control or limit the accessibility of attributes, methods, functions, classes, etc... Simply access modifiers define the scope of the components. When it comes to Python there are no specific keywords to define access modifiers; but the number of underscore parameters handles that.

In Python there are 3 access modifier levels.
  • public (no underscore parameters as prefix)
  • private (two underscore parameters as prefix)
  • protected (one underscore parameter as prefix)
Lets learn about those using Python attributes.


Public access modifier:

When an attribute is public, that can be accessed from each and every class. Simply it is visible for all the classes.
There are no underscore parameters as attribute name prefixes.


Private access modifier:

When an attribute is private, that can only be accessed within the same class. When we try to access a private attribute from outside the class it will throw an AttributeError error.
To make an attribute private, we use two underscore parameters as an attribute name prefix.
Since private attributes are not accessible from outside the class, we can write a public method inside the same class to access the private variable.


Protected access modifier:

When an attribute is protected, that can be accessed from the same class or from a sub-class of that class. When we try to access a protected attribute from outside the class which is also not a sub-class it will throw an AttributeError error.
To make an attribute protected, we use one underscore parameter as an attribute name prefix.
From this example you can also understand how to create a sub-class using a super-class. Here class Dog is created by extending the class Animal.


So now you are aware of how to handle access modifier of the Python.
Lets discuss about OOP with Python from the next article.


Cheers...!!

Sunday, November 24, 2019

[PythonOOPTutorial] 02 Python Classes, Attributes, Methods and Functions

This is the second article of the Python OOP Tutorials.
If you are new to Python, this is how to install Python on your computer.

In this tutorials we assume you have some basic experience in programming.


CLASSES

Below is how to define a class in Python.

Here "Animal" is the class name. Currently we do not have any attributes or methods in it. So we write "pass" inside it. You can find more about Python empty classes from here. At the end we have created an object using out empty class.
We use the keyword "class" before the class name and ":" symbol after the class name based on Python standards.

You can find more about Python naming conventions from here.


ATTRIBUTES

Classes can contain different attributes which describe the class.
In Python we do not need to define the type of the attribute; it is not mandatory.

Below is how to define attributes and assign values for attributes in Python.

To comment a line you can use "#" symbol in the beginning of the line

When it comes to attributes, there are two types of attributes.
  • Class Attributes - Value common for all the instances of the class
  • Instance Attributes - Values changes based on the instance
If you need more details about Class attributes and Instance attributes please refer this.


METHODS

Classes may contain different methods which serves an specific task.
Below is how to define methods in Python.
Here method name is "sound". We use keyword "def" before method name and ":" symbol after the method name. As the default input parameter we have to pass the object which invokes the method as an input parameter "(self)".

Python has methods and functions. We have to keep that in mind carefully. You can find out more about those differences on methods and functions from here.

When it comes to Python methods;
  1. Method is always associated to an object.
  2. The object which invokes the method, will be passes as a parameter to the method.
  3. Returning data from a method is optional.
There are two types of methods in Python.
  • Instance Methods
  • Static Methods
If you need more details about Instance methods and Static methods, please refer this.


FUNCTIONS

Functions are almost like Methods, but those are not associated with objects. You can define a function in the same way as a method. Functions do not need default input parameters; input parameters are optional for functions.

Here we have a function called printCountry which has an input parameter which is optional. Additionally we have assign that input parameter a value. It will be used when we call the function without passing a parameter.

First we call our function with the argument "India". So it will assign India to the input parameter and print Country name is India.
At third function call we do not pass any argument to the function. So it will assign Sri Lanka to the input parameter and print Country name is Sri Lanka


Those are the fundamentals of Python required for OOP (Object Oriented Programming).
Lets discuss about OOP with Python from the next article.


Cheers...!!


More about Class attributes and Instance attributes..

For example consider we have a class called Animal and it has a Class attribute called numberOfLegs.
So when we assign a value for a class attribute it is same across all its instances.


To change the value we have to access it with the class reference; not with the object reference. If we try to change the value of the class variable using object reference, it will create a Instance attribute with the same name.
Here initially there are no instance attributes called numberOfLegs. So animal1 and animal2 objects will display the value as 4. 

Then we change the value of numberOfLegs for animal1 object. So what will happen is instance attribute will be created for animal1 object and its value will be 3.

When we ask for the value of any attribute; system will check whether there is any instance attribute with the same name; if a matching instance attribute found, system will return that value.
If there is no matching instance attribute found, then system will check for class attributes.

At animal1 object, system will find the instance attribute and return its value 3.
At animal2 object, system will cannot find a instance attribute and then checks for a class attribute. Then system find the class attribute and return its value 4.


More about Instance methods and Static methods..

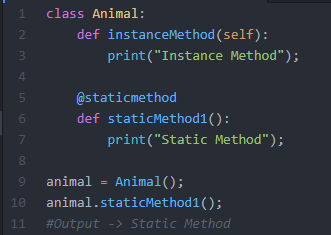
Usually we write methods inside classes where at least one input parameter is required are called Instance methods. Static methods are bit different from instance methods.
On static methods we do not need the default self parameter. To make a static method we have to use the @staticmethod annotation before the method definition. So that will make a static method.
We can call static methods by the class reference too.

Ex: here we have called the static method by creating an object reference. 
animal = Animal();
animal.staticMethod1();

Other than that, we can directly call the static method using the class reference too.
Animal.staticMethod1();
This will also provide the same output.

Saturday, November 23, 2019

[PythonOOPTutorial] 01 How to Setup Python

This is the first article of the Python OOP Tutorials.

First you can check whether you have already installed python on your computer by executing following command.

"python --version"


If python version is displayed, then it says you have already installed Python on your computer. Otherwise you can follow below steps to install python on your computer.

You can download Python setup from Python.org. From there it is always better to download the latest version.


If you want to download a previous version you can choose those from the "Downloads" section. (Python downloads page)

There are different download types and you can select what is most suitable based on your operating system and requirement. What I prefer is exe version.

Then run the downloaded exe file. Do not forget to check the "Add to path" checkbox. Otherwise you will have to add Python for the PATH manually. 

After successful installation you can run the previous command again and check for the current Python version check by the command "python --version". It should work now.To make sure Python is working fine, you can download below file and run it.Sample file: https://drive.google.com/open?id=1vHIAmN7cpfqjJNESmY-23ABSE9rm5THZ- Open command prompt.
- Navigate to the file saved location.
- Run "py TestPython.py"
Then you will get output like below.
Now Python is working fine in your computer. Lets continue the learning process.
Cheers...!!


Wednesday, August 7, 2019

Canary Tokens (Traps) – Expose Information Leaks

Canary Tokens are traps to identify information leaks. Using canary tokens you can identify who has accessed your secret files (timestamp, geographical location, etc...)

You can generate canary tokens in different formats. To generate canary token you can visit below websites.


>> Lets start with the first website. 

  • First you have to select the token type from the drop-down. For our easiness select "MS Word" option.
  • your email address (when file is accessed, notification will be sent to this email address)
  • some text to identify the token

Then download the generated canary token. When you open the file, you will get an email notification as below (you can edit the content of the downloaded MS Word file as you wish. You can include some false information and an attractive file name such as "my_passwords". So hackers will surely open that file and you will get their information)


When you open the email alert you will see some details of the file access.


By clicking on the "Manage this Canarytoken" you can manage the future email notifications for this canary token.
By clicking on the "More info on this token" you can see details access information.


>> If you visit the second website first you have to enter two fields.

  • your email address (when file is accessed, notification will be sent to this email address)
  • some text to identify the token

After clicking on "Generate Token" button you will see what are the available options to generate canary tokens. Below are some of the token types available.

  • Web bugs
  • DNS Tokens
  • SMTP Token
  • Remote Image
  • QR Code
  • SQL Server Alert on SELECT, UPDATE, INSERT, DELETE
  • MS Word
  • Acrobat Reader PDF
  • SVN Token
  • Signed EXE / DLL
  • SecretKeeper Token
  • Windows Directory Browsing

For this example you can select "MS Word" and download the canary token file. When you open the file, you will get an email notification as below (you can edit the content of the downloaded MS Word file as you wish. You can include some false information and an attractive file name such as "my_passwords". So hackers will surely open that file and you will get their information)


When you open the email alert you will see all details of the file access.


When you visit the provided url at the bottom of the email, you will be able to see the file access history too.

Using MS Word files is just a one way to use canary tokens. There are lots of options available and you can use those wisely.


Cheers...!!

Thursday, September 6, 2018

AWS SQS Standard Queue vs FIFO Queue

When it comes to cloud computing, AWS plays a major role as a IaaS (Infrastructure as a Service), PaaS (Platform as a Service) and SaaS (Software as a Service). Amazon Web Service (AWS) is a well known public cloud service provider. You can find out more about AWS from https://aws.amazon.com/

Simple Queue Service is one of the most useful service which is provided by AWS. If you are using AWS then no need to waste your time on implementing queues. AWS has done that part for you. You just have to use it. You can find more details from https://aws.amazon.com/sqs/

AWS SQS provides two types of queues.
  • Standard Queue
  • FIFO Queue (First In First Out queue)

Comparison of Standard and FIFO queue types are as below.

Standard Queue FIFO Queue
Available on all AWS regions Available in the US West (Oregon), US East (Ohio), US East (N. Virginia), and EU (Ireland) regions
Unlimited Throughput Support up to 3,000 messages per second
Message delivered at least once, but occasionally more than one Delivered once
Not execute in order they sent First in first out
Good for high throughput scenarios Recommended when order of the event is important


Hope this will help you too.


Cheers...!!

Wednesday, August 16, 2017

Solve unrelated svn blames while building projects with maven

Previously I have used Subversion as the version control system. Then moved the projects to Git. Converted all the Jenkins build jobs accordingly. But while building some sonar jobs got below error.

[ERROR] Failed to execute goal org.codehaus.mojo:sonar-maven-plugin:2.6:sonar (default-cli) on project YourTestProject: The svn blame command [svn blame --xml --non-interactive -x -w --username ******** --password ******** src/your/test/project/code/path/Main.java] failed: svn: 'src/your/test/project/code/path/' is not a working copy -> [Help 1]

Since we are using Git and so no need of any svn blames. Using below parameters disabled svn activities.

-Dsonar.scm.disabled=True

Hope this will help you too.


Cheers...!!

Saturday, June 11, 2016

Solve Jenkins Maven jobs build fail due to OutOfMemoryError

There are two major OutOfMemoryError types.

  1. java.lang.OutOfMemoryError: Heap space
  2. java.lang.OutOfMemoryError: PermGen space
You can easily solve this by adding/changing Jenkins environment variables.
Go to
Manage Jenkins >> Configure System >> 
In the Global Properties section check the Environment Variables check box.

Then add parameters as below
Name: MAVEN_OPTS
Value: -Xmx1024m -XX:MaxPermSize=1024m

Setting Xmx will solve your Heap Space issue and setting XX:MaxPermSize will solve your PermGen Space issues.


Cheers...!!

Thursday, June 9, 2016

Solve Jenkins and Subversion time sync issue

You will notice below warning when your Jenkins server and Subversion server have different times (not in a time sync status)

WARNING: clock of the subversion server appears to be out of sync. This can result in inconsistent check out behavior.

There are two ways to sync Jenkins server with svn.
  1. Based on Jenkins time and svn time
  2. Based on Jenkins revision number and snv revision number

Before build projects Jenkins takes updates from svn. If times are not synced changes will not reflect properly. To solve this issue you can configure Jenkins to take updates based on head revision. Fix is simple.
You just have to add @HEAD to the end of your svn url.

for example:
If your previous svn url is 'http://your.svn.server/svnroot/your/code/location'
add @HEAD to the end of url.
New url is 'http://your.svn.server/svnroot/your/code/location@HEAD'

This will solve Jenkins and svn out of sync issues.


Cheers..!!

Saturday, June 6, 2015

Why URI Encoding...?


Most of you must heard about URI Encoding...

Why do we need to Encode URIs?

It is because otherwise servers cannot identify what we sent there.

When we are accessing/using urls we cannot add spaces there. While sending a GET request you may want to add spaces there. Then how do you send those data..?
When we are accessing/using urls we cannot add '/' there. '/' is reserved for use as a component separator. Then how do you send those data..?
Consider that you want to send a XML file attached there..

Here comes the URI encoding.

For example:
you want to encode this
http://www.mysite.com/?XML=<cs><o n="authcode" v="d82709ae"/><c n="FlightSearch"><q n="StartDate" v="18-May-2015"/><q n="EndDate" v="21-May-2015"/></c></cs>

into this
http://www.mysite.com/?XML=%3Ccs%3E%0A%3Co%20n=%22authcode%22%20v=%22d82709ae%22/%3E%0A%3Cc%20n=%22FlightSearch%22%3E%3Cq%20n=%22StartDate%22%20v=%2218-May-2015%22/%3E%0A%3Cq%20n=%22EndDate%22%20v=%2221-May-2015%22/%3E%3C/c%3E%0A%3C/cs%3E


You can try it here..


URL:


Cheers...!!

Sunday, March 29, 2015

Automatic data refresh Oracle ADF tables using ADF Poll

As you know we are using Oracle ADF tables to represent data at database tables, views, etc... When application loads tables load data from db and displays those. But if data is changed or new added or existing data get deleted..?? Then we need a mechanism to display the updated data.

We can use ADF Poll for this. Then we can use poll event to refresh table data after every time period.


Steps:


  1. Insert Poll inside “panelHeader” in which table is located
  2. Set poll interval from poll properties- This is the time gap for every refresh. for Ex: if you have set poll interval as 5 seconds table data will be refreshed after every 5 seconds.

    If you want you can take this value from template properties.
    Value you entered: #{manage_Template.dataRefreshRate}
    (This is used to get the refresh value by using the method in manage_Template)
  3. Set partial triggers from poll properties - Here you can specify the table which you want to get refreshed. for Ex: table1
  4. Set partial triggers from ADF table - Give the poll id for this field.
    Table --> Behavior --> Partial Triggers --> Set poll id here
  5. Set Poll Listener from poll properties - This is the most important mapping which links what is the action has to be taken out when poll event triggers

    Type a method e.g.: refreshSPIntentionTab ()
    Press enter
    (Method is created in .java file)
  6. Add the below code to the poll listener method using appropriate VOIterators


    There are three stages at this code.


    STAGE 1:

    If you want only to refresh the table you can use the current method. At this method you can’t maintain the current row position after table refresh.

    public void refreshSPIntentionTab (PollEvent pollEvent) {
            FacesContext fctx = FacesContext.getCurrentInstance();
            ValueBinding dcb = fctx.getApplication().createValueBinding("#{bindings}");
            DCBindingContainer bindings1 = (DCBindingContainer) dcb.getValue(fctx);
            if(bindings1!=null){
                DCIteratorBinding dciter = bindings1.findIteratorBinding("DeliveryIntentionsSPApprovVO1Iterator ");
                if(dciter!=null){
                    if(dciter.getCurrentRow()!=null){  
                        dciter.executeQuery();
                    }
                }
            }
        }


    STAGE 2:

    If you want to refresh the table and maintain the current row position after the table refresh.... We can apply this only for a single table; not for master-detail tables.

    public void refreshSPIntentionTab (PollEvent pollEvent) {
            FacesContext fctx = FacesContext.getCurrentInstance();
            ValueBinding dcb = fctx.getApplication().createValueBinding("#{bindings}");
            DCBindingContainer bindings1 = (DCBindingContainer)dcb.getValue(fctx);
            if (bindings1 != null) {
                DCIteratorBinding dciter = bindings1.findIteratorBinding("DeliveryIntentionsSPApprovVO1Iterator ");
                if (dciter != null) {
                    if (dciter.getCurrentRow() != null) {
                        Key current_row_key = dciter.getCurrentRow().getKey();
                        dciter.executeQuery();
                        if (current_row_key != null) {
                            try {
                                dciter.setCurrentRowWithKey(current_row_key.toStringFormat(true));
                            } catch (Exception ex) {
                                System.out.println("Exception in current_row_key");
                            }
                        }
                    }
                }
            }
        }


    STAGE 3:

    If you want to maintain the current row position of master-detail tables after the table refresh, use the following methods.

    // for the master table refresh
    public void refreshSPIntentionTab (PollEvent pollEvent) {
            FacesContext fctx = FacesContext.getCurrentInstance();
            ValueBinding dcb = fctx.getApplication().createValueBinding("#{bindings}");
            DCBindingContainer bindings1 = (DCBindingContainer)dcb.getValue(fctx);
            DCIteratorBinding it = bindings1.findIteratorBinding("DeliveryIntentionsSPApprovVO1Iterator");
            ViewObject vo = it.getViewObject();
            Row row = vo.getCurrentRow();
            Key key = row.getKey();
            int rangePosition = vo.getRangeIndexOf(row);
            int rangeStart = vo.getRangeStart();
            if(rangePosition==(-1)){
                rangePosition=rangePositionCommon;
                rangeStart=rangeStartCommon;
                }
            vo.executeQuery();
            vo.setRangeStart(rangeStart);
            Row[] rows = vo.findByKey(key, 1);
            if (rows != null && rows.length == 1) {            
                vo.scrollRangeTo(rows[0], rangePosition);
                vo.setCurrentRowAtRangeIndex(vo.getRangeIndexOf(rows[0]));
                rangePositionCommon=rangePosition;
                rangeStartCommon=rangeStart;
            }
        }

    // for the detail table refresh
    public void refreshSPIntentionTab (PollEvent pollEvent) {
            FacesContext fctx = FacesContext.getCurrentInstance();
            ValueBinding dcb = fctx.getApplication().createValueBinding("#{bindings}");
            DCBindingContainer bindings1 = (DCBindingContainer) dcb.getValue(fctx);
            if(bindings1!=null){
                DCIteratorBinding dciter = bindings1.findIteratorBinding("DeliveryIntentionsSPApprovVO1Iterator ");
                if(dciter!=null){
                    if(dciter.getCurrentRow()!=null){  
                        dciter.executeQuery();
                    }
                }
            }
        }

Now all the setup processes are completed. Please check your new functionality.


Cheers..!!

Saturday, February 14, 2015

Find Gender and Birthday by NIC Number


National Identity Card number is unique for each Sri Lankan.
At a glance it is just a sequence of numbers; but it contains some hidden details such as the persons gender and date of birth.
You can calculate those from below form. Enter your NIC no and click on "GO" button.
Note: There are two sections for Old format NIC and New format NIC.

Old NIC No  : v 
Gender   :
Birthday : 

New NIC No  :
Gender   :
Birthday : 


Cheers..!!

Saturday, September 21, 2013

How to set JXL Character Encoding

JXL (Java Excel API) is a open source Java API which allows Java developers to read Excel spreadsheets and to generate Excel spreadsheets dynamically. In addition, it contains a mechanism which allows java applications to read in a spreadsheet, modify some cells and write out the new spreadsheet.

You can learn how to use it by the following link.

At the default settings JXL is unable to read some special characters such like ®, ™, ©, etc.. which are used commonly.
This is the way how to overcome that issue.

Usually you can create the Workbook file as below.

Workbook workbook = Workbook.getWorkbook( new File(<path_to_excel_file>) );


At that case you can not read special characters like above mentioned. So this is the solution.

WorkbookSettings ws = new WorkbookSettings();
ws.setEncoding("CP1250");
Workbook workbook = Workbook.getWorkbook( new File(<path_to_excel_file>), ws );


Here CP1250 is a standard character encoding format. Like that you can specify what is the Character set you are going to use (ex: utf8, cp1250, etc...). So set the character set at the very beginning. Then you can read and write the characters which are defined under that character encoding system.

Cheers...!!

Tuesday, August 20, 2013

Convert XSD file to JAR by one command


What is XSD ....??

It is considered as the grammar of the XML... The XML Schema language is also referred to as XML Schema Definition (XSD). Simply XSD files are used to validate XML.


XSD files can be converted to a JAR file simply using the Apache XMLBeans. 

If you have already setup Apache XMLBeans then go to the folder which contains the xsd file and apply the below command which will convert xsd file to a jar file. (if not follow the Setup XMLBeans instructions)

>> scomp -out <jar_file_name.jar> <xsd_document_name.xsd>

example:
>> scomp -out getSupplierNames.jar getSupplierNames.xsd

Setup XMLBeans

First you have to setup Apache Ant and JDK 1.4 or later version.

JDK installation...
JDK can be downloaded from Java downloads. Install it and set the Environment Variables if they are not set correctly (Right click My Computer --> Properties --> Advanced --> Environment Variables --> System Variables)
    Variable: JAVA_HOME
    Value   : <folder where the JDK software is located>

If PATH variale exists append the value, else add the value.
    Variable: PATH
    Value   : %JAVA_HOME%\bin

Apache Ant installation...
Apache Ant can be downloaded from Ant Binary Distributions. Download the zip file and extract it.
Set below Environment Variables as described above.
    Variable: ANT_HOME
    Value   : <folder where you uncompressed Ant to>


If PATH variale exists append the value, else add the value.
    Variable: PATH
    Value   : %ANT_HOME%/bin

Apache XMLBeans installation...
 Apache XMLBeans can be downloaded from download mirrors. Download the zip file and extract it.
Set below Environment Variables as described earlier.
    Variable: XMLBEANS_HOME
    Value   : <folder where you uncompressed XMLBeans to>


If PATH variale exists append the value, else add the value.
    Variable: PATH
    Value   : %XMLBEANS_HOME%\bin

If CLASSPATH variale exists append the value, else add the value.
    Variable: CLASSPATH
    Value   : <path to xbean.jar>
              [usually this should be %XMLBEANS_HOME%\xbean.jar]

Now all the setup processes are completed and you can convert XSD files to JAR files using the scomp command as described at the top of the article....

CHEERS.......!!